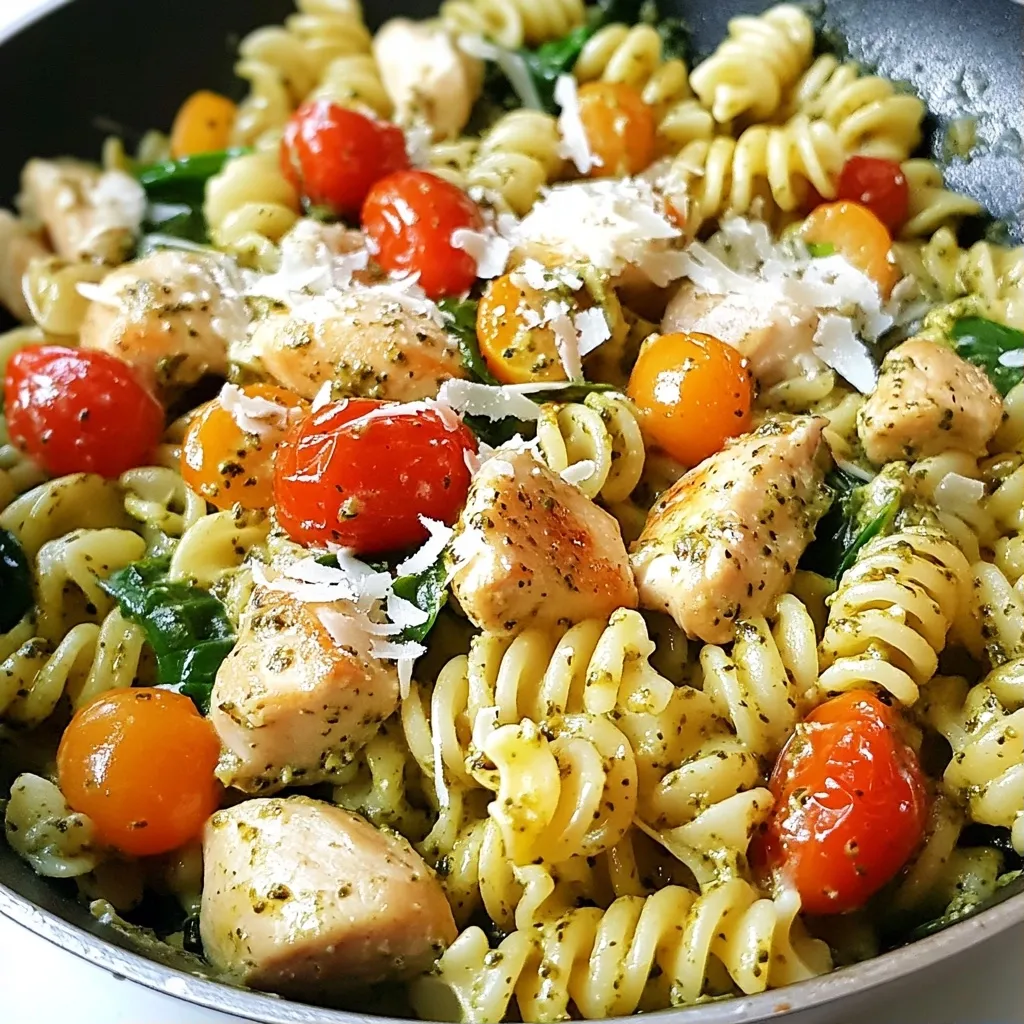
If you're craving a quick and tasty meal, you're in for a treat! This Creamy Pesto Chicken Pasta Skillet is the perfect solution for busy nights. It combines tender chicken and creamy pesto with pasta for a flavor-packed dish you can whip up in no time. Get ready to impress your family and enjoy a delicious, hassle-free dinner that makes the most of simple ingredients. Let’s dive into the recipe!
Why I Love This Recipe
- Quick and Easy: This recipe comes together in just 30 minutes, making it perfect for busy weeknights.
- Flavorful and Creamy: The combination of pesto and heavy cream creates a rich and satisfying sauce that coats the pasta beautifully.
- One-Pan Meal: Cooking everything in one skillet means less cleanup, allowing you to enjoy more time with family or friends.
- Customizable: You can easily swap out the chicken for shrimp or add your favorite vegetables for a personal touch.
Ingredients
Main Ingredients
- 2 boneless, skinless chicken breasts
- 8 oz. fusilli pasta
- 1 cup heavy cream
- ½ cup pesto sauce
Additional Ingredients
- 1 cup cherry tomatoes, halved
- 1 cup spinach leaves
- 2 tablespoons olive oil
- 2 cloves garlic, minced
Seasoning and Garnish
- Salt and pepper to taste
- Grated Parmesan cheese for garnish
This creamy pesto chicken pasta is simple yet packed with flavor. You need just a few main ingredients to make a delicious meal. The chicken breasts are the star here, cooked to perfection. Fusilli pasta adds a fun twist, holding onto the creamy sauce well.
Heavy cream and pesto sauce blend beautifully, creating a rich sauce. The cherry tomatoes and spinach add color and freshness. Olive oil and garlic bring warmth to the dish. For the best taste, always season with salt and pepper. Finally, a sprinkle of grated Parmesan cheese adds a nice finishing touch.
You can find everything you need at your local grocery store. This recipe makes cooking easy and fun. Enjoy the process and savor the flavors!
Step-by-Step Instructions
Cooking the Pasta
To cook the fusilli pasta, fill a large pot with water. Add a pinch of salt and bring it to a boil. Once boiling, add the fusilli. Cook it according to the package instructions until it’s al dente, which means it should be firm but not hard. This usually takes about 8-10 minutes. Once done, drain the pasta in a colander and set it aside.
Sautéing the Chicken
For the chicken, heat 2 tablespoons of olive oil in a large skillet over medium heat. Add the bite-sized chicken pieces. Season them with salt and pepper to enhance the taste. Cook the chicken for about 5-7 minutes. It should turn golden brown and be fully cooked inside. Once ready, remove the chicken from the skillet and set it aside on a plate.
Making the Creamy Pesto Sauce
In the same skillet, add 2 cloves of minced garlic. Sauté the garlic for about 1 minute until it becomes fragrant. Then, pour in 1 cup of heavy cream and ½ cup of pesto sauce. Stir the mixture well to combine. Bring it to a gentle simmer, which helps the flavors meld together.
Combining Ingredients
Now it’s time to add the cooked chicken back to the skillet. Also, add 1 cup of halved cherry tomatoes and 1 cup of fresh spinach leaves. Mix everything together well. Cook for about 3 minutes until the spinach wilts and the dish is heated through.
Final Mixing and Serving
Finally, add the drained fusilli pasta to the skillet. Toss everything together gently, ensuring the pasta is well coated with the creamy pesto sauce. Cook for an extra 2-3 minutes to warm the pasta completely. Taste your dish and adjust the seasoning if needed. When serving, sprinkle some grated Parmesan cheese on top for added flavor. Enjoy your creamy pesto chicken pasta!
Tips & Tricks
Cooking Tips for Perfect Chicken
To keep chicken juicy and tender, choose boneless, skinless breasts. Cut them into bite-sized pieces for even cooking. Season well with salt and pepper. Sauté in olive oil over medium heat for 5-7 minutes. Use a meat thermometer to check for 165°F. This ensures safety and perfect doneness.
Pesto Sauce Variations
You can choose between homemade and store-bought pesto. Homemade pesto gives you control over flavors. Blend fresh basil, garlic, pine nuts, Parmesan, and olive oil. If you're short on time, store-bought pesto works great too. Look for high-quality brands with few ingredients for the best taste.
Enhancing Flavor
To boost flavor, consider adding sun-dried tomatoes or artichokes. A squeeze of lemon juice brightens the dish. You can also toss in red pepper flakes for heat. Fresh herbs like basil or parsley add a nice touch. Lastly, serve with extra grated Parmesan for a rich finish.
Pro Tips
- Choose Fresh Ingredients: Using fresh basil for your pesto and ripe cherry tomatoes will enhance the dish's flavor and freshness significantly.
- Customize the Pesto: Feel free to add nuts like pine nuts or walnuts to your pesto for added texture and flavor depth.
- Adjust Creaminess: If you prefer a lighter sauce, you can substitute half of the heavy cream with chicken broth for a delicious variation.
- Save Some Pasta Water: Reserve a cup of pasta water before draining; it can be added to the sauce to adjust consistency and enhance flavor.
Variations
Recipe Substitutions
You can change some ingredients to fit your taste. If you don’t have chicken, try shrimp or tofu. For pasta, fusilli works great, but penne or rotini are good choices too. You can also use whole wheat pasta for a healthier option.
Vegetarian Option
If you want to skip meat, go for plant-based ingredients. Use mushrooms or eggplant instead of chicken. For the cream, try coconut milk or cashew cream. Add more veggies, like bell peppers and zucchini, for extra flavor and color.
Gluten-Free Option
To make this dish gluten-free, swap fusilli with gluten-free pasta. Many brands offer tasty options. Just be sure to check the cooking time, as it may differ. This way, everyone can enjoy a creamy pesto pasta.
Storage Info
How to Store Leftovers
To keep your Creamy Pesto Chicken Pasta fresh, store it in an airtight container. Make sure to cool it down first. Place it in the refrigerator within two hours after cooking. This helps to keep it safe and tasty. Leftovers should last for about three to four days. When you're ready to eat, just grab it from the fridge.
Reheating Instructions
Reheating your pasta dish is simple. I recommend using the stovetop for the best flavor. Heat a bit of olive oil in a skillet over medium heat. Add the pasta and stir it often. You can add a splash of cream if it seems dry. This keeps the dish creamy and delicious. If you're in a hurry, you can use the microwave, but stir well to warm it evenly.
Freezing Guidelines
You can freeze Creamy Pesto Chicken Pasta, but it may change texture. To freeze, let the dish cool completely. Place it in a freezer-safe container and seal it tightly. It should last about two to three months in the freezer. When you're ready to eat, thaw it overnight in the fridge. Reheat as mentioned above for the best results.
FAQs
Can I make this recipe ahead of time?
Yes, you can! This dish stores well. To store, let it cool first. Place it in an airtight container. It will last in the fridge for about 3 days. You can also freeze it for up to 2 months. Just remember to thaw it overnight before reheating.
What can I serve with Creamy Pesto Chicken Pasta?
You can serve this pasta with many sides. A fresh green salad pairs well. Garlic bread is another great option. Roasted vegetables add color and flavor too. You can also consider a light soup for a cozy meal.
How do I make this dish spicier?
To add some heat, try red pepper flakes. Sprinkle them in when cooking the chicken. You can also add sliced jalapeños for a fresh kick. If you like sauces, drizzle some hot sauce on top when serving. Adjust the spice to your taste!
This blog post covered a tasty recipe for Creamy Pesto Chicken Pasta. You learned about the key ingredients like chicken, pasta, and pesto. I provided detailed steps to cook each part, from the pasta to the sauce. I also shared tips for keeping the chicken juicy and suggested variations for different diets.
In conclusion, this dish is easy to make and packed with flavor. With these instructions, you're all set to impress anyone at your table. Enjoy your delicious meal!